How to Fix Cracked Leather Jacket: Restore Your Favorite Piece in Style
A leather jacket is more than just a fashion statement, it’s a symbol of timeless style and durability. However, over time, even the highest quality leather can develop cracks. But fear not! In this article, we will provide you with a comprehensive guide on how to fix cracked leather jacket, enabling you to restore its original beauty and ensure it remains a cherished piece in your wardrobe for years to come.
Assessing the Damage
The first step is to carefully assess the extent and severity of the cracks. Inspect the jacket thoroughly, noting any areas of concern. Determine the cause of the cracks, such as aging, dryness, or improper care. This evaluation will help you plan the appropriate repair approach.
Materials that will be needed to eliminate cracks on the leather jacket
Before starting any repairs, gather the necessary materials and tools to clean and condition your leather jacket. Here’s what you’ll need:
- Soft cloths or sponges. Use these to apply the cleaner and conditioner to the leather gently. Make sure the clothes are clean and free from any debris that could scratch the leather.
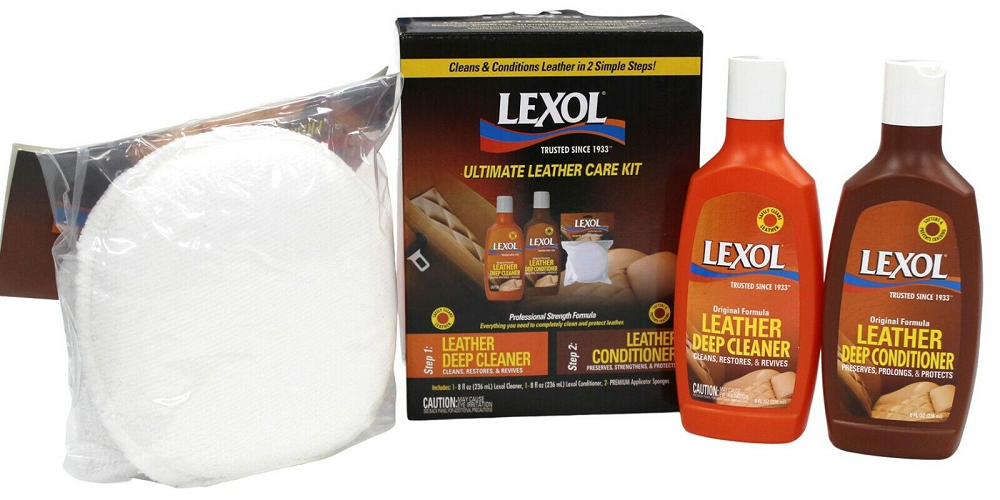
- Leather cleaner. Look for a high-quality leather cleaner that is specifically designed for the type of leather your jacket is made of. Different leathers may require different cleaning products, so choose one that is suitable for your jacket’s material.
- Leather conditioner. Invest in a reputable leather conditioner to restore moisture and suppleness to the leather. Look for a conditioner that does not contain harmful chemicals that could damage the leather over time.
- Optional: Soft-bristle brush or toothbrush. For tough stains or hard-to-reach areas, a soft-bristle brush or toothbrush can be used to gently scrub the leather. Make sure the bristles are soft to avoid scratching the surface.
Once you have these materials and tools ready, you can proceed with the cleaning and conditioning process, ensuring that your leather jacket is prepared for the repair stage.
Remember, it’s essential to follow the instructions provided with the specific cleaning and conditioning products you choose, as different brands may have slightly different application methods.
Take your time, work gently, and allow the leather to dry thoroughly before moving on to the repair phase.
How to Fix Cracked Leather Jacket: Cleaning and Conditioning
Properly cleaning and conditioning your leather jacket is crucial for achieving successful repairs. Follow these detailed steps to ensure your jacket is thoroughly cleaned and adequately conditioned:
Cleaning the jacket
- Begin by removing any loose dirt or dust from the surface of the leather jacket. Use a soft cloth or a gentle brush to wipe away debris, paying attention to seams and crevices where dirt may accumulate.
- Next, apply a small amount of a leather-specific cleaner to a clean, soft cloth or sponge. Gently rub the cleaner onto the surface of the jacket in a circular motion. Be sure to cover the entire jacket, including the sleeves, collar, and pockets.
- Pay extra attention to any stained or heavily soiled areas. You can lightly scrub these areas with a soft-bristle brush or a toothbrush to help lift the dirt and stains. However, be cautious not to apply too much pressure, as it may damage the leather.
- Once you have cleaned the entire jacket, use a separate clean, damp cloth or sponge to remove any excess cleaner residue. Make sure to rinse the cloth or sponge frequently to avoid spreading the residue back onto the leather.
- Allow the jacket to air dry completely before proceeding to the conditioning step. Avoid exposing it to direct sunlight or using artificial heat sources, as they can cause the leather to dry out and crack.
Applying leather conditioner
- After the jacket has dried, it’s time to restore moisture and flexibility to the leather by applying a leather conditioner. Squeeze a small amount of conditioner onto a clean, soft cloth or sponge.
- Begin applying the conditioner to the leather, using gentle, circular motions. Make sure to cover the entire surface, including seams and edges. Focus on areas that tend to dry out faster, such as elbows and shoulders.
- Allow the conditioner to penetrate the leather for the recommended time specified on the product label. This typically ranges from a few minutes to several hours, depending on the conditioner.
- Once the conditioner has had enough time to work, use a clean, dry cloth to wipe away any excess conditioner. Gently buff the leather to restore its natural shine.
Choosing the right conditioner
- It’s important to select a leather conditioner that is suitable for the specific type of leather your jacket is made of. Different types of leather, such as full-grain, top-grain, or suede, may require different conditioning products.
- Consult the manufacturer’s recommendations or seek advice from a leather care professional if you are unsure about the best conditioner for your jacket. They can provide guidance based on the specific characteristics of your leather and help you choose a product that will effectively nourish and protect the material.
By following these detailed steps and using appropriate cleaning and conditioning products, you can ensure that your leather jacket is properly prepared for the repair process.
Cleaning removes dirt and grime, while conditioning restores moisture and flexibility, making the leather more receptive to repairs and helping to prevent further cracking.
Repairing the Cracks: Restoring the Integrity of Your Leather Jacket
When it comes to repairing cracks in your leather jacket, it’s important to approach the process with care and precision. Follow these detailed steps to effectively repair mild cracks and achieve a seamless finish:
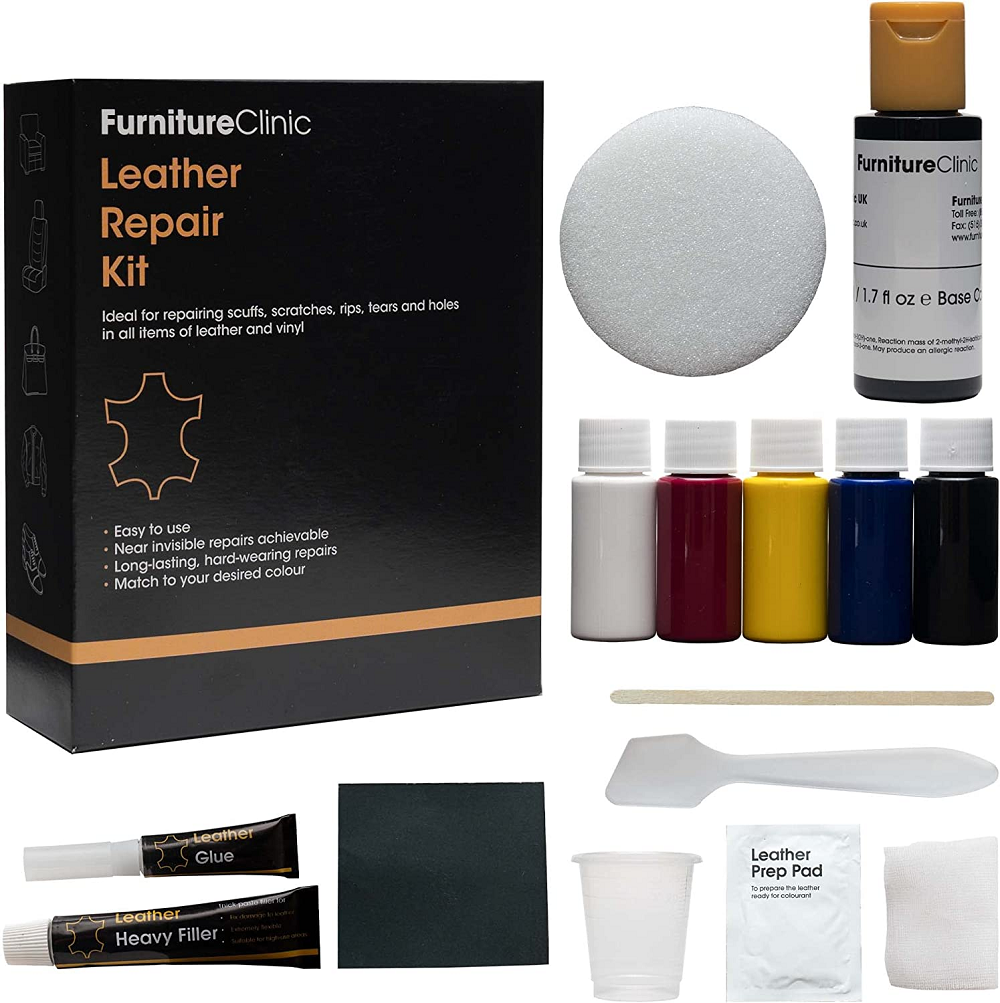
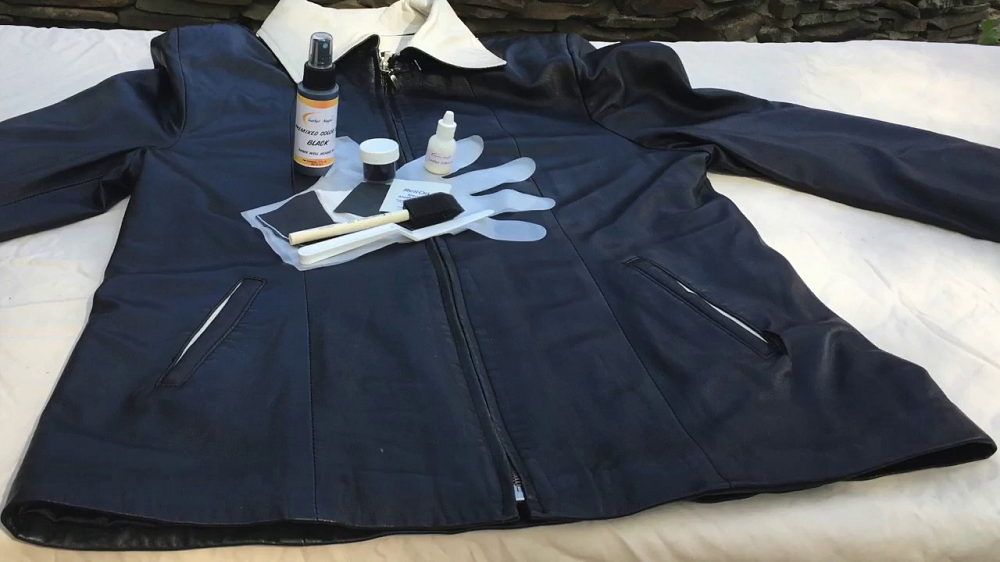
Using leather repair kits:
- Begin by gathering a leather repair kit that contains the necessary materials, such as leather filler, a spatula or applicator, and sandpaper. These kits are readily available at most leather supply stores or online.
- Carefully read and follow the instructions provided with the kit. Each kit may have specific application techniques and drying times, so it’s important to adhere to the guidelines for the best results.
- Start by cleaning the cracked area with a soft, damp cloth to ensure it’s free from any debris or residual cleaner. Allow it to dry completely before proceeding with the repair.
Applying leather filler:
- Using the spatula or applicator provided in the repair kit, scoop a small amount of leather filler onto the tool.
- Apply the filler to the cracks, ensuring it fills the entire length and depth of each crack. Work in small sections to maintain control and precision.
- Use the spatula or applicator to smooth and level the filler, blending it seamlessly with the surrounding leather. Apply gentle pressure to ensure a strong bond between the filler and the leather.
Sanding and buffing:
- Once the filler has dried according to the instructions, use fine-grit sandpaper to gently sand the repaired areas. Start with a lighter touch and gradually increase pressure as needed to achieve a smooth surface.
- Pay attention to the edges of the cracks, ensuring they are well blended with the surrounding leather.
- After sanding, wipe away any dust or debris with a clean, soft cloth.
- To achieve a polished finish, use a leather conditioner or a specialized leather buffing cloth to gently buff the repaired areas. This step helps restore the natural shine and texture of the leather, making the repair less noticeable.
Remember to take your time and work patiently, ensuring that the filler is applied and smoothed with precision. The final result will be a repaired area that seamlessly blends with the rest of the jacket, revitalizing its appearance and extending its lifespan.
Dealing with Deep Cracks: Seeking Professional Assistance
If your leather jacket has deep or extensive cracks, it’s best to seek professional help. Consult a leather repair specialist or a reputable leather repair service in your area. They have the expertise and tools to handle complex repairs.
In some cases, they may recommend replacing the damaged section with a matching piece of leather, creating a seamless repair that blends with the original jacket.
Preventive Measures: Preserving the Quality of Your Leather Jacket
Taking preventive measures and establishing a regular maintenance routine can significantly prolong the life of your leather jacket and minimize the occurrence of cracks. Follow these detailed steps to keep your jacket in top condition:
Regular maintenance routine:
- Set a regular schedule for cleaning and inspecting your leather jacket. Aim to clean it at least once or twice a year, depending on how often you wear it and the environmental conditions it is exposed to.
- Inspect the jacket during cleaning sessions, paying attention to any signs of wear or potential areas prone to cracking. Early detection allows for timely repair or preventative measures.
Conditioning and moisturizing:
- Invest in a high-quality leather conditioner that is suitable for your jacket’s type of leather. Refer to the manufacturer’s recommendations or seek professional advice to ensure you choose the right product.
- Apply the conditioner following the instructions provided. Generally, you will gently rub a small amount of conditioner onto a clean, soft cloth and then evenly distribute it over the entire surface of the jacket.
- Focus on areas that are more susceptible to drying out, such as elbows, cuffs, and collars. These areas are prone to cracking due to repeated movement and exposure.
Proper storage:
- When not wearing your leather jacket, store it in a cool, dry place away from direct sunlight. Excessive heat and sunlight can cause the leather to dry out and fade, increasing the risk of cracking.
- Avoid storing your jacket in plastic or non-breathable covers, as they can trap moisture and lead to mildew or mold growth. Instead, opt for a breathable garment bag or a cotton sheet to protect it from dust.
- If possible, hang the jacket on a padded or wide-shouldered hanger to maintain its shape and prevent creases.
Conclusion
Repairing a cracked leather jacket is a rewarding process that allows you to revive and prolong the life of a beloved garment.
By carefully assessing the damage, cleaning, conditioning, and using appropriate repair techniques, you can restore your leather jacket’s beauty and ensure it remains a cherished piece in your wardrobe for years to come.
Remember to practice regular maintenance to prevent future cracks and enjoy your restored leather jacket with confidence and style.